A finished 3D printed part rarely comes from a single step. Behind every prototype or production-ready component is a structured workflow that begins the moment a design file leaves your computer and ends only after inspection, cleanup, and delivery. Understanding this process helps businesses set realistic timelines, avoid design mistakes, and communicate more effectively with their manufacturing partner.
This guide walks through the complete 3D printing process — from CAD design to finished part — so you know exactly what happens at each stage and what to expect when you work with a 3D printing services provider.
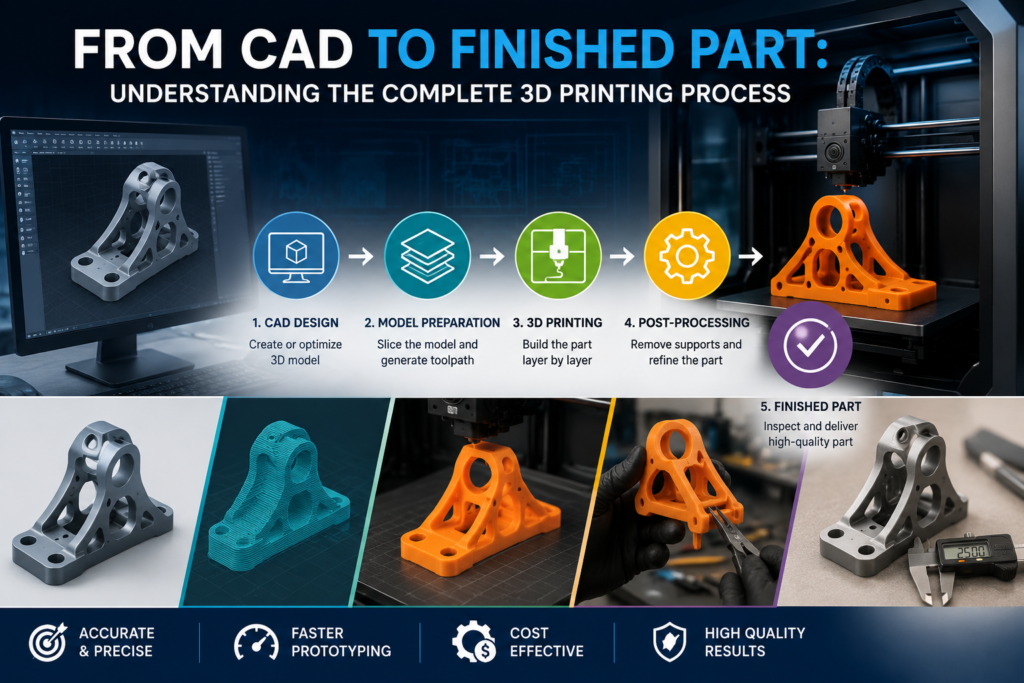
From CAD Design to Finished Part: The Complete 3D Printing Workflow
Every additive manufacturing project starts with a digital model and ends with a physical object in hand, but a lot happens in between. The 3D printing workflow typically involves design preparation, file conversion, machine setup, the actual print run, and a series of post-processing and inspection steps before the part is ready to use.
For businesses new to additive manufacturing, this can feel like a black box. In reality, it’s a repeatable, engineering-driven process — one where each stage directly affects the strength, accuracy, and finish of the final part. Skipping or rushing any step, from design review to post-processing, often shows up as a defect, dimensional error, or a part that simply doesn’t perform as intended.
Knowing the full sequence also helps you ask better questions of your provider and spot where delays or quality issues might originate.
Step-by-Step 3D Printing Process Explained
Step 1: CAD Design and File Preparation
The process begins with a CAD model created in software like SolidWorks, Fusion 360, or similar tools. At this stage, designers need to consider printability — wall thickness, overhangs, tolerances, and support structures all affect whether a design will print successfully. This is also where design-for-manufacturing (DFM) feedback from your printing partner adds the most value, catching issues before they become expensive reprints.
Step 2: File Conversion and Slicing
Once the CAD file is finalized, it’s exported into a printable format, most commonly STL or OBJ. This file is then processed through slicing software, which converts the 3D model into thin horizontal layers the printer can build one at a time. During slicing, technicians configure critical print parameters — layer height, infill density, print orientation, and support placement — all of which influence strength, surface finish, and print time.
Step 3: Technology and Machine Selection
With the file sliced, the next decision is which printing technology and machine will produce the part. This is where a provider’s range of industrial 3D printing equipment matters. A well-equipped facility can match your part to the right process rather than forcing every job through the same machine. For a deeper look at how different technologies compare, see FDM vs SLA vs SLS: Complete 2026 Comparison.
Step 4: The Print Run
This is the stage most people picture when they think of 3D printing — the machine building the part layer by layer. Depending on the technology, size, and complexity, a print run can take anywhere from a few hours to a couple of days. Throughout the build, machines need to be monitored for material feed issues, layer adhesion problems, or mechanical errors that could compromise the part.
Step 5: Part Removal and Initial Cleanup
Once printing finishes, the part is removed from the build platform. Depending on the process, this may involve removing support structures, washing away uncured resin, or brushing off excess powder. This initial cleanup prepares the part for any further post-processing it needs.
Step 6: Post-Processing
Many parts require additional finishing to meet their intended function or appearance. This can include sanding, polishing, curing under UV light, heat treatment, dyeing, or applying coatings. Post-processing is where a rough print becomes a finished part ready for assembly, testing, or customer delivery.
Step 7: Quality Inspection
Before a part ships, it should be checked against the original design intent. This step catches warping, dimensional drift, or surface defects that could affect fit or function — especially important for parts that need to integrate into larger assemblies.
Step 8: Final Delivery
The last step is packaging and delivering the finished part, along with any documentation such as inspection reports or material certifications the client may need.
Choosing the Right 3D Printing Technology and Materials
No single 3D printing process works best for every application, which is why technology selection is one of the most important decisions in the entire workflow. FDM offers a cost-effective option for functional prototypes and larger parts, SLA delivers high-resolution detail and smooth surface finishes, and SLS produces strong, complex geometries without needing support structures. The right choice depends on your part’s function, required tolerances, and production volume.
Material selection is just as critical. A provider with a broad range of Materials — from standard plastics to flexible, heat-resistant, or high-strength engineering-grade resins — gives you more flexibility to match the material to the part’s real-world demands, rather than settling for whatever happens to be in stock.
The machines behind the process matter too. Industrial-grade 3D Printers generally offer tighter tolerances, larger build volumes, and better repeatability than desktop-level equipment, which becomes especially important as you move from a single prototype toward production runs. If you’re evaluating equipment options for in-house or partner-based manufacturing, the Commercial Guide to Industrial 3D Printers for Manufacturing Companies offers a detailed breakdown of what to look for.
Quality Inspection, Post-Processing & Final Delivery
The final stretch of the 3D printing workflow is often what separates a usable part from a rejected one. Post-processing steps — sanding, curing, coating, or assembly — directly affect how a part looks, feels, and performs. Skipping or rushing this stage can leave a part technically “printed” but not actually ready for its intended use.
Quality inspection is equally critical, particularly for parts with tight tolerances or those destined for functional assemblies. Providers equipped with 3D Scanners can compare a finished part directly against the original CAD file, flagging any deviation before it becomes a costly problem downstream. This step gives businesses confidence that what was designed is actually what gets delivered.
Once inspection is complete, the part is packaged and shipped, ideally along with any inspection reports or documentation needed for your internal quality records.
Why Choose 3D Proto Farm for End-to-End 3D Printing Services
Navigating the full journey from CAD file to finished part requires more than just access to a printer — it requires technical expertise at every stage of the process. 3D Proto Farm supports businesses through the entire workflow, from initial design review and material selection through printing, post-processing, and final quality inspection.
With access to multiple printing technologies, an extensive material library, industrial-grade equipment, and in-house inspection capabilities, 3D Proto Farm helps ensure every part meets its intended specification, whether it’s a single rapid prototype or a full production run. Explore 3D Proto Farm’s services to see how the complete 3D printing process comes together for your next project.